In my previous article about texture filtering I mentioned that scaling down images using point sampling, or scaling to less than half size using linear filtering, looks bad because some source pixels are discarded.
Why exactly is this a problem?
Try this thought experiment:
We have a 256x256 texture, which is being scaled down by a factor of 1/256, so the entire image covers just a single screen pixel. What color should this pixel be?
If we use point sampling, only one pixel of the 256x256 image will be used, and the others discarded. This can give pretty random results depending on which specific pixel happens to be chosen!
Consider what happens if we tile our texture, so the scaled down image is repeated 100 times. If each repetition lines up exactly with one screen pixel, they will all choose the same source pixel, but if repetitions and screen pixels do not line up (maybe you are scaling down by 1/255 or 1/257 rather than 1/256, or using a 3D perspective projection), each repetition will end up choosing a different random location in the source texture. This is basically the same thing as:
    for each destination pixel:
        destination = sourceTexture.GetPixel(random.GetNext(), random.GetNext());
which is not going to give the best looking results :-)
It would obviously be better if we could average all the pixels from the source texture, rather than having to choose just one of them. But averaging 256x256 color values is too slow to do in realtime.
When you can't afford to compute something on the fly, it is time to precalculate...
A mipmap is a precalculated copy of an image that has been shrunk to a lower resolution using a more accurate, higher quality filtering algorithm than would be possible in realtime on the GPU. Mipmaps are arranged in a chain where each image is half the size of the previous one, for instance:
The GPU will automatically choose the appropriate image depending on how much the texture is being shrunk down.
To draw with mipmaps, you need two things:
The difference between Point and Linear mip filtering is how the mipmap level is chosen:
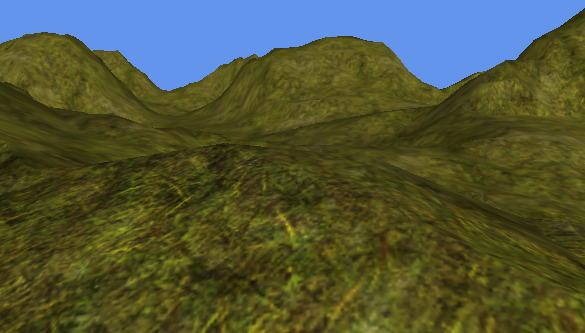
Let's see this in action. Here is the linear filtered terrain from my previous post:
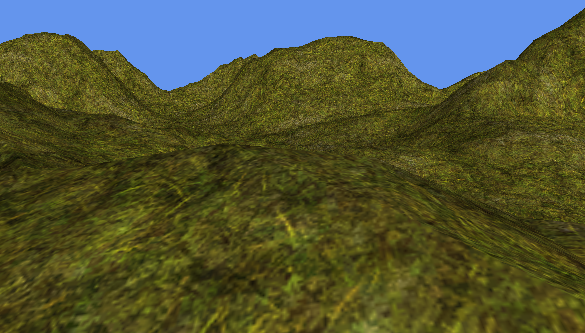
And now using mipmaps:
Note how the distant hills appear smooth and free from noisy aliasing.
"Mipmaps take up too much memory"
Actually, mipmaps use little extra memory, thanks to the power of powers:
If you continue this sequence, you'll see that an entire mipmap chain all the way down to 1x1 takes up just 1/3 more memory than the original texture. So it's a negligible overhead, especially once you get past that first mip.
"Mipmaps are slower for the GPU to render"
In fact, they are often much faster! If you aren't scaling down a texture, having mipmaps won't cost anything. But when you are scaling down, mipmaps can save crazy amounts of memory bandwidth.
Remember our example of a tiled 256x256 texture, where each repeat is being scaled down to 1x1 (a common situation in things like terrain rendering). Without mipmaps, every destination pixel will sample a radically different location in the source texture, so the GPU must jump around fetching colors from different areas of memory. GPUs typically have very small texture caches, relying on the fact that textures tend to be accessed sequentially, so this access pattern will thrash the cache and can bring even a high end card to its knees. But with mipmaps, the GPU can simply load a small mip level which will easily fit in the cache, and can then render many destination pixels without having to go back to main memory.
So mipmaps are not just for reducing aliasing: they can actually speed up rendering, too.
Shawn's Recommendation™: if you are going to draw a texture in 3D, or planning to scale it down to less than half size, you should always use mipmaps.