The Sprite Effects sample uses this picture of my cat Rhys:
I needed an alpha channel to mask out the cat and remove the couch from the background: a common requirement when fixing up photos for use in games.
The first step is to use whatever kind of magic wand selection your paint program provides. Fiddle around with the threshold settings, and try using add-to-selection to combine multiple wand regions. Depending on your image this may work quite well or very badly. My cat is a similar color to my couch, so the wand did a terrible job, but you can make this work much better if you think about it while taking the photograph. For instance if you want a texture of a tree, try to find one that is silhouetted against a blue sky rather than in front of other foliage. Objects that contrast well with their background are much easier to select.
No matter how clear your photo may be, automatic selection will never get everything quite right, so the next step is to use the freehand lasso selection tool to add-to-selection all the areas of your object that were missed by the wand, and remove-from-selection all the background areas that it picked up by mistake. This can be laborious, but isn't difficult especially if you are zoomed way in on a nice high resolution image.
Once my selection was complete I used the feather command to soften the selection border by a couple of pixels, then filled the inside of the selection with white, inverted the selection, and filled the outside with black. Scaling the image down from my high working resolution produced a nicely antialiased alpha channel:
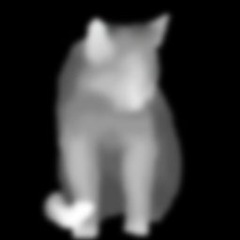
For the normal mapping sprite effect, I also needed a normalmap of my cat. There are basically four ways to create normalmap textures:
3D scanners cost thousands of dollars, so option 1 was out. I'm no good at building 3D models, ruling out option 2, and option 3 was irrelevant because my cat is a real animal, not just a procedural algorithm! So I was stuck with number 4.
A normalmap is a texture that contains direction vectors describing which way each pixel is facing. This allows a flat surface to be lit as if it was curved or bumpy. Typically the X component of the normal vector will be stored in the red channel, the Y component as green, and the Z component as blue. I suppose it is theoretically possible to draw textures directly in that format, but it would be incredibly confusing and counterintuitive. It is much easier to draw a depth map, using black to indicate low areas and white for things that are bumped outward, and then use a filter to convert this into normalmap format.
Normalmap filters are available as plugins for Photoshop and the Gimp, but I prefer to do this using a custom content pipeline processor. In the Sprite Effects sample I added my depth texture directly to C# Express, then used the NormalMapProcessor to apply the necessary filtering. That way I don't have to manually reapply the filter every time I tweak my depth map.
To draw depth, I started out by making a copy of the original photograph, then created a second layer so I could draw over the top of it. I temporarily set my new layer to be half transparent, so I could see through it to the original image.
First off, I used the pencil tool with a fairly large brush, drawing dark gray over areas that were set a long way back, white over areas that were far forward, and mid gray in between. Then I used the smudge tool to soften the borders between my three depth levels, creating smooth gradients in places where I wanted the depth to change gradually. Finally, I ran a gaussian blur filter over the entire image. This served partly to cover up any flaws in my work, but also improved the quality of the lighting because normalmaps always look better when they are slightly blurred.
This is the kind of task where the longer you spend on it the better a result you can get, but I'm quite pleased with what I achieved in just 10 minutes: