"The eating was one of the most horrible things. Excepting the first two days after I entered the asylum, there was no salt for the food." - Nellie Bly
Salt is a strange thing. In minute quantities, it makes almost any food taste better. In medium quantities, it adds moreishness to snacks and makes people want to consume beer. In large quantities, it is a deadly poison.
Cubemaps serve the same role in the land of 3D graphics. They are a cheap and easy way to make almost any model look richer and more interesting, but I don't think enough people are aware of how to use them.
What is reflection mapping?
Imagine if you took a picture of the environment surrounding an object. You could then map this image onto the object, dynamically calculating texture coordinates based on the camera position, so your object appears to be reflecting the scene around it.
Simple.
And yet incredibly powerful.
If you use a crisp, high resolution reflection image, you get a shiny, polished, chrome surface. Great as a special effect, but easily overdone, like those oversalted pretzels they sell at baseball games.
The magic happens if you choose a blurry reflection image, and only blend a small percentage of this with the existing material color. Here lies the recipe for subtle visual complexity and deliciousness.
What is a cubemap?
The trouble with a statement like "take a picture of the environment surrounding an object" is the environment stretches out in many different directions. How can you encode all these possible directions into a single texture? Mapmakers have been struggling with this problem for years.
In the world of realtime graphics, we use cubemaps instead of regular 2D textures. You can think of a cubemap as a collection of six square images. They are often drawn like this:
but the six images (called "faces") are actually separate.
To see how this provides a complete environment, imagine if you printed out this picture, then cut out the white corner areas. You could now fold it into a box, making three vertical folds, then folding the top and bottom flaps over to make a sealed cube. This cubemap was created in such a way that the edges of each face will join up seamlessly.
How can I create cubemaps?
There are three main ways: one expensive, one difficult, and one that nobody knows about.
The expensive way is to render them out at runtime. Construct a RenderTargetCube, then draw your environment six times, with the camera facing along each axis in turn. This produces a very accurate and dynamic reflection map (often used in racing games where you can see the car windows reflecting the environment as it scrolls past), but drawing the environment so many extra times doesn't come cheap!
The difficult way is to manually construct a set of six face images, then use the DirectX Texture Tool to combine them into a cubemap DDS file. Good luck getting the edges of each face to join up seamlessly...
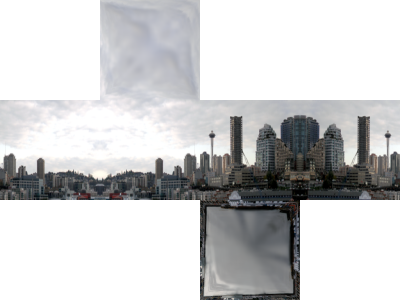
The way I recommend is a custom content processor which warps a regular 2D image into a cubemap. For instance the cubemap I showed above was created from this photo of downtown Seattle:
Purists are probably recoiling in horror at this point. "But that photo doesn't contain a complete environment! There simply isn't enough info there to make this work!"
Sure. But reflection maps don't need to be exact. They should be subtle and complex and interesting, but most importantly, easy to create, so you can put them on all your objects and try out lots of different images to see what works best.
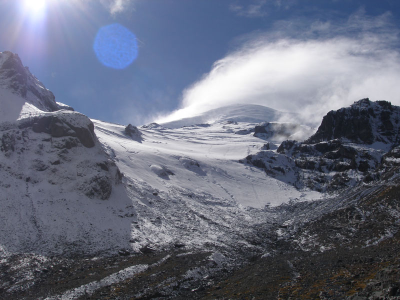
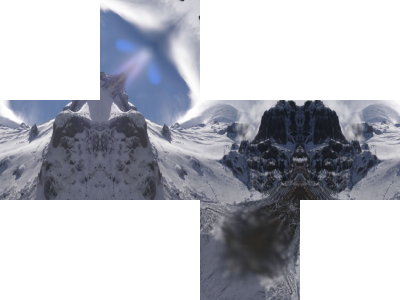
Once you have an automated cubemap generation processor, it is trivial to experiment with different reflection maps. For instance it is the work of a moment to turn this photo of a glacier on Mount Rainier:
into this cubemap:
I'm sold. Where do I get this incredible processor?
To reuse this in your own projects, you just need to copy the CubemapProcessor.cs file.
What should I use as the source image?
Experiment!
It doesn't have to be an actual picture of the actual scene that surrounds your actual object.
For instance a dark image dappled with bright blobs will give the impression of a complex environment with many small light sources, far more cheaply than you could properly calculate that many lights.
An image that is mostly dark but has a couple of thin bright lines creates an underwater caustic effect.
Blurring the reflection image makes the effect more subtle and prevents objects from looking too shiny.
In MotoGP, the artists created one static reflection map per level, by the simple technique of taking a screenshot of that level! People would see sky and trees reflected in the exhaust pipe of the bikes, and notice that the color of these trees always properly matched the level. Because this was just a static reflection map, the position of the reflected trees was never right, but this was too subtle for anyone to care.
Half-Life 2 takes the same idea one step further. They also precalculate reflection maps using screenshots of each level, but they create many cubemaps per level, and render using the closest one to your current position, so the reflection map can change as you move around the world.
For the bike selection screen in the MotoGP menu system, we wanted the bikes to look as good as possible, but there wasn't any particular environment for them to reflect. A cubemap containing trees and sky looked silly in that context. I tried maybe 20 different photos to see what worked best, and if I remember right, eventually went with a blurry shot of the keyboard and mouse from my desk! I have no idea why that looked good, but for some reason it did.